First find a pair of pillowcases - these were at the thrift shop for $1.50. That's a pretty affordable pair of PJ pants! I think they are king sized, which is great if you have a taller kid to sew for. You could easily do this with a sheet or an XL men's tshirt as well, just remember the hem will be the hem of the PJs!
Since I like to do as little work as possible, I use the hem of the pillowcase for the hem of the pants. This means my final project will require me to sew only 3 seams plus a waistband casing.
Each pillowcase will give you one leg. If you're making this for a toddler, you might be able to squeeze two legs out of one pillowcase! Lay the ironed pillowcase on the table.
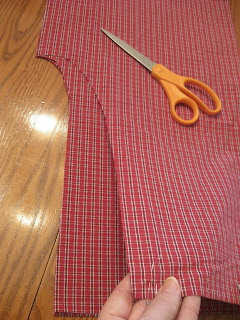
Now for the cutting - I loosely based my pattern from a pattern I had in my stash, but honestly, you don't need one. Measure your kid's hips, and divide by 4. Remember to add some extra breathing room for ease! Add a seam allowance, too. Mark that width starting from the folded edge of the pillowcase. Now measure the rise - the distance from the child's waist to in between their legs. Again, add a couple inches because you want enough fabric at the top for a waist casing. Now cut a J shape from the rise mark toward the waist edge, removing about 2" of width. Clear as mud? This picture should help.
From the curved end of the J, cut down to the hem of the pants. You can either leave the legs straight or taper them in a bit. I tapered them in a little, but the hem opening is still very loose. We're going for lounge pants here, not leggings!
The last step for cutting is to make the J wider on one layer of each leg. This makes the back of the pants. Grab the top layer of one leg and cut as shown above, then grab the BOTTOM layer of the other leg and do it again. You can see I put some pins by my fingers to mark the back so I wouldn't get confused.
The rest is easy sewing, and I got too caught up in it to remember to take pictures! Take one leg, as pictured above, and sew up the leg seam until you get to the J. Do the same for the other leg. I did french seams because I know my boy will wrestle and generally be rough on them. Plus, I love a finished seam!
Now flip one leg right side out and slide that down into the other leg which is inside out - this makes a big tube. Line up the inseam and double stitch it. I also zigzagged the edges to prevent fraying. Open everything up right side out and press down 1/4" on the waist. I folded over another 2" and pressed to accommodate a 1 3/4" width elastic. Sew the casing, leave and opening, insert the elastic and sew it all closed. I also put in a small folded piece of ribbon as a tag to mark the backside.

A great finished product and a happy (but camera shy) boy!


Yay, what a great idea for boys! It looks like they turned out great!
ReplyDelete