Pages

Sunday, January 21, 2018

Back to it

Hi, it's me. I've been away far too long - it's good to be behind the keyboard again! I wish I could tell you why I was away for months on end, but it mostly boils down to the busyness of homeschooling 2 high schoolers and 2 middle schoolers. We're in the home stretch, so my focus on that can't waver now!

Hi. Remember me?? I'm dreaming up some exciting things to share!


I haven't neglected my art. In fact, I feel like I've put more time into it than ever! I loved the 30 day painting/sketchbook challenge I did last June. It was like a mini art retreat each day, allowing myself at least 30 minutes to create. It taught me about myself, which art styles I feel most comfortable with, and what my weaknesses are. Two things really stood out to me: I love lettering and I love illustration.

But after June, school picked up (we start planning early for the next year, then jump back in early August!) and the paints got pushed to the back of my desk in favor of other supplies. Brush pen lettering was a quick art fix for me in those moments between grading papers and making meals. I love the simplicity of uncapping a pen and writing! I stash them in one of my pencil bags in my purse with a small sketchbook and can write anywhere! Not only do they give me that paint brush fix I need, but I found that illustrating with them makes for some gorgeous lines that fit with my fun and funky style.

Lettering/illustration from my Christmas cards 2017

My love for brush pens had to be shared. I started teaching classes as a lettering consultant at AR Workshop. I had been teaching art classes at the local fine arts center for a few months, but this really confirmed item #3 that I learned about myself last year: I love teaching art - to all ages! I have more classes than ever on my calendar teaching both traditional kids art classes and hand lettering.

When I look through my sketchbooks, I see have been writing letters for many years! My graphic design background and love of typography are a core part of who I am as an artist. So I'm continuing to push myself to grow in that area. Dip pens and calligraphy are the next mountain to climb. I love a good challenge! As a kid, I remember asking for calligraphy pens as birthday gifts. In art school I used dip pens in drawing and illustration classes. The tools were already familiar, and my eye has been trained in letterforms from years of graphic design work. So tackling calligraphy should be a breeze, right? Ha. As with any new craft, there's a learning curve! I'm excited to start the copperplate calligraphy class that Christen Alloco will teach. Learning a very structured hand will be a good balance to my more freeform style I typically do.


examples of recent lettering work


That's the past six months in a nutshell. My lettering has spread to signs, ornaments, coloring pages, wallets, and more - lots to check out in my etsy shop! Which brings me to the exciting changes I'm working on! I'm working on switching this blog over to my own website. That' will give me more flexibility to show portfolio samples to clients, share my thoughts about art, and even have my own online shop! I hope to reach out to the wedding and event markets more.

Of course a website it just one of the things I'm cooking up....a possible coloring page/devotional booklet, calendar art, drawing classes for local students....so many ideas are running through my head! I'm a list maker, so my planner is full of notes and scrawled on pages jammed into the pages. Follow me over at my instagram account to stay with the day to day happenings!

(And I promise I won't take another 6 month break! Talk again soon!)


Monday, June 5, 2017

Then Sings my Soul

Hello! I've been absent here a bit - the past two weeks have seen a lot of house guests over here. Relatives, friends...so much fun but wow, am I tired out from it all! Just as the last guest was leaving, my teen daughter fell on the lawn and dislocated her kneecap. Ouch! She's recovering but needs lot of help from me. 

In the midst of this, I decided to challenge myself by painting a page in my sketchbook each day this month. That may not sound like a big deal, but some days it's really hard to pull myself away from life and sit down to paint. I'm not the first to do this kind of challenge, and reading how it has helped other artists grow was inspiring. I hope to work on developing my own style and refine my skills with some of the tools I use.

Here's yesterday, Day 4:


Monday, May 15, 2017

Sara's Sketchbook - Blue Blossoms

I hope everyone had a great Mother's Day weekend! My family made me feel so loved - they really are the best kiddos (and husband) out there. They went out of their way to take care of me, and even sat outside on the deck (with the bugs!) with me. :) I'm the only outdoors lovin' member of this family!

The day was relaxed, and I worked on a spread in my sketchbook. I never know how these will turn out, and I'm really happy with this one! Sometimes I look at my art when I'm finished and am surprised. All these moody blues aren't really me, but I like how they play with the reds and oranges.


Thursday, May 11, 2017

Spring Dreams

Yesterday was a lovely spring day, full of sunshine and working in my garden. We are trying to spiffy up our backyard, so much work is needed. The kids trampled the grass to death leaving us a dirt yard, so we are replanting and coaxing those new blades of green to grow. The flower beds need to be edged, weeded, and annuals planted. I really enjoy getting my hands in the dirt and seeing my efforts take off!

After a good weeding session yesterday with my son, I came in and painted an imaginary garden full of all the colors I love. :)


What flowers do you grow? Favorite colors? I love yellow, purple and orange blooms!

Wednesday, May 10, 2017

New Prints!!

There's a trio of new prints added to my shop! I'm so excited to share these with you - the colors are so vibrant and the lettering has just enough whimsy to make me smile.


I'd love to know what you think of these. I plan to add more prints to my shop when able to.


Tuesday, May 2, 2017

Mother's Day Gift Ideas

Mother's Day is coming quickly, and so I've been adding more items to the shop to stock up! There are lots of prints and cards and coloring pages, but did you know there are also home goods?

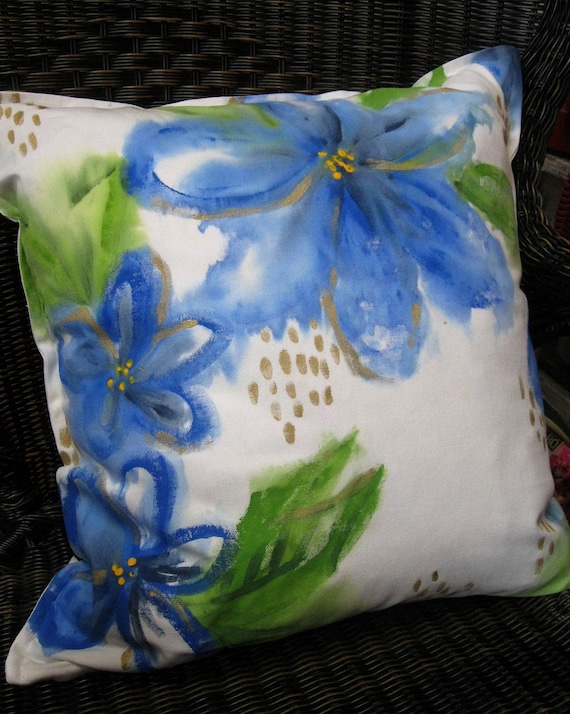
How about a pretty place to sit and relax? Dress up Mom's favorite reading chair with a hand painted pillow cover!

Hand Painted Pillow Cover - Watercolor Blue flowers

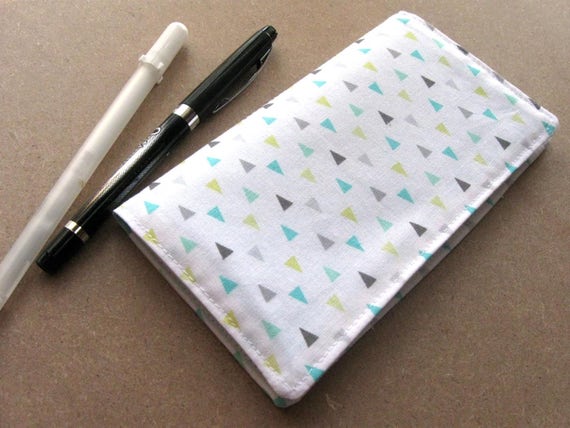
Or maybe your Mom is the more organized, practical type - always keeping the family on their toes and making sure everything is done in good order. She might be the type to enjoy a pretty new checkbook cover (did you know I liked to sew, too?) :)

Fabric checkbook cover - wallet, coupons, receipts, and more!

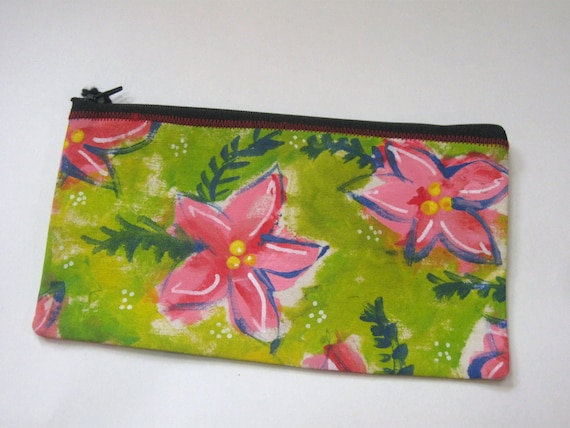
Does Mom always have that odd item that's needed at hand? Band aids? Hair ties? Tire pressure gauge? (hey, some moms are REALLY prepared!) Or does she love to keep her make up handy for on-the-go touch ups? A hand painted zip pouch will make her day!

Pink Flower Canvas Zip Pouch - Mothers Day, graduation, Birthday

Moms do a lot of hard work, physically and emotionally, much of which goes unnoticed and unappreciated. Honor her with a phone call, a hand written letter, or a gift which tells her THANK YOU and I LOVE YOU.

It's a hard day for those whose moms are absent in one form or another - take some time to think about her, pray for her, and remember her. Encourage and bless other moms - especially the new moms - by sharing how your mom was a blessing to you.

Tuesday, April 25, 2017

His Mercies are New Every Morning

Good morning! Even though we've had rain for days (I miss you, sunshine!), I can still jump out of bed because I know that all of yesterday's junk is history! Today is a new day, and in Christ, it's full of promise! I love dwelling on such truths while noodling out a painting.

I plan on adding prints of this to my shop very soon! Stay posted!

Monday, April 24, 2017

Zinnias

Every summer I see the bright, bold zinnias at a neighbor's house and I always kick myself for not remembering to plant some of my own. But this year I've got a bunch of baby zinnias growing in my pots! Their bold, bright colors make them one of my favorite garden flowers. And they're easy to grow - bonus! 

While I wait for my zinnias to grow, I painted my own version. May summer come soon and may all your flowers bloom!

Friday, February 24, 2017

Lettering Blitz!

Last year I spent a lot of time selling my art at local craft shows. It was a great experience and opportunity to meet lots of wonderful people, but it did not make a good fit for my products. So I spent the first few weeks of this year thinking about my art and what direction I want to grow in, both in my personal style and as a business. I enjoy so many different forms of creating, but I really felt the need to narrow my focus for Domina Design. I took some time to think about what I enjoy the most, and what facets of my art were the strongest. Flipping through the past year's sketchbooks was very enlightening. One thing stood out over and over again - lettering.


I have always loved typography and finding creative ways to draw the same 26 characters of our alphabet. So it shouldn't have been a surprise to find that lettering appeared in almost all my sketchbook pages! After thinking about it awhile, I decided to intentionally work on improving my lettering skills this year. Research and a host of lettering supplies from my guy for Valentine's Day has kept me busy!

I'm pretty familiar with brush lettering because most of what I've done is with an actual brush (duh!). However, brush PEN lettering is new to me. It has a slightly different feel from a paintbrush, and definitely different from the dip pens I've used in the past. Perhaps you could describe it as a cross between the two? The Tombow Fudenosuke and Pentel Touch Sign Pen have been my two favorites so far. The Tombow Dual Tip brush pens have a great juicy color and feel, but I'm still adjusting to the larger tip - which means larger writing!


One of the hardest things is being patient with myself as I learn. I make LOTS of mistakes and find imperfections galore. But I tell myself to chill out, keep practicing, and that it's those imperfections which make hand lettering stand out from a refined computer font! And while there are lots of demos, practice sheets, and pictures of gorgeous lettering online, I find it important to pull back from that and find my own style. I know I'll be happiest with that work and have something I can really be proud to call my own.


Thursday, January 19, 2017

For the Love of Letters - I AM

A little lettering practice while my son was doing a Bible project for school. I'm getting used to using Crayola markers, but I think I'm ruining the tips with my heavy hand!


Saturday, January 14, 2017

For the Love of Letters - Happy Birthday

A little lettering practice on my son's birthday - happy birthday to my 14 yr old guy!


The start of a new year requires reflection and redirection for many. While I'm not a resolution person, I have been thinking long and hard about the direction for my art. What do I really love to do? Where do my strengths lie? What are my favorite pieces from last year? Flipping through my sketchbooks told me a lot. I discovered I really don't do well with watercolor. Acrylics have the strength of color I love. And lettering rose to the surface, no surprise. The designer in me will always love typography!

This year I want to work on my hand lettering, and part of that process includes using new materials. So I bought myself a new box of Crayola markers, the same kind I used decades ago when I was in grade school. I must admit, there was a bit of nostalgia involved while creating this piece!

I love a bit of birthday fun shortly after Christmas - it keeps the party going!

Friday, January 6, 2017

Welcome Snow!

There's a big snowstorm headed for the Southeastern states - which you know is a big deal if you've spent any time in the South. No plows. No salt. No winter driving savvy. Being a Michigan gal, 6" of snow isn't something you really stop life for, but south of the Mason-Dixon it's a different story.


Everyone thinks a snowstorm warrants stocking up on bread and milk. Nope, not me. I'd rather get crafting! How about a new SNOW themed wreath for the front door? All the Christmas decorations are down and the house feels a little bare.

In the classic use-what-you-have spirit, I took our old autumn wreath and gave it a make over.


The old autumn wreath. I'm so over monograms.


Most of the leaves and artificial pumpkins had fallen off over the years, so it was an easy job stripping it down. I still liked the pheasant feathers, so I kept them. Yeah, pheasants live through snowstorms too, so they're seasonally appropriate. :) 


I rummaged around for anything white and wintry - I found some sheer & solid white fabric scraps, a few yarn pom poms I made for another project that never materialized, and leftover ribbon from Christmas. Our front door is black, and the feathers are black and brown, so I wanted to include a black and brown garland to tie it all together. Remember, I'm all about quick and cheap - a paper bag and Sharpie.


Ribbons, pom poms and fabric strips were tied to the center point of the feathers. The sheer fabric reminded me of blowing snow, so I swept that around the top. The SNOW garland was a quick project to assemble. The banners aren't identical and I hand drew the letters. All in all, this wreath came together in about 20 minutes and cost $0. That's a win in my book!

And now that I'm freezing from hanging my wreath outside, I'm off to snuggle and work on some WARM knitting. Currently I'm making the Milk Stout Cardigan by Thea Colman (Ravelry link). It's a cozy cabled cardigan with a shawl collar - perfect for keeping my neck warm! There's a lot of knitting to do before it's finished...


I hope you're inspired to be creative this weekend no matter what the weather! Be safe in the snowstorm, and as Grandma always said, "Wear a hat!" 

Monday, December 19, 2016

Merry Christmas!

The Domina is taking a break to celebrate Christmas with family. Your support and love has been great this year! I can't wait to see what the new year brings! :)

Merry Christmas! See you all in 2017!


Saturday, November 26, 2016

Pom Pom Garland available!!

It's Party Time!!! 
Bright and jazzy pom pom garlands are now available in my shop


Eight feet of fuzzy, funky fun!


Great to brighten up Christmas, birthdays, patio parties, baby showers, and more!

Get them here!

Friday, November 25, 2016

Always Time for Tea - a new custom sign!

I love coming up with unique designs for my clients, and when one approached me with the request to make a piece that spoke to her love of tea, I was more than happy to oblige! I did a few rough sketches of layouts for her to pick from, then set to work.

A chalk sketch helps with placement and trying out some variations. I love the fact that this is a no-commitment step! I often change things on the fly.


Using a long paint brush handle as a mahl stick keeps my hand steady and from dragging through wet paint. It has come to be an essential part of my sign painting process. That and no coffee!

 A cup or two of tea during this process was needed inspiration.


Finished size: 12"x24"


I love taking custom orders! Send me an email for more information! 
Thanks!

Saturday, November 12, 2016

Christmas items in the works!

I know, I know. It's not even Thanksgiving yet. Give the Christmas stuff a break, lady! I can't help myself - the crisp air and constant desire to reach for a sweater get me thinking about Christmas. And a few fall craft shows have given me the opportunity to test out a couple festive items.

Pom poms!! I love their bright burst of color! I was inspired to make some ornaments from them, using leftover poms from this project....


Pom garlands!! Aren't these fun!? Christmas red and green is so limiting, and dull. For the biggest holiday of the year I think we need all the COLOR we can get, especially in the darkest part of the year. I keep thinking of all the fun ways to use this garland beyond Christmas - birthday parties, summer grill-outs, New Years Eve parties.... See what I mean? I've had these garlands at a few places and it is always the CHILDREN who run up and love to touch and play with them. One little girl promptly wore hers as a necklace! I love it! 

These ideas have been around the internet awhile, so I finally had to try them. Let me tell you, they are a cinch to make. I'd love to show you how... Which brings me to an exciting announcement.....coming in a few days!! Keep you posted!!


Saturday, April 16, 2016

Imagine

What do you imagine? 

Flying on a trapeze at the circus?

Being a fairy in an English cottage garden?


Dancing in the deeps with giant squid?


Just one hour of pure peace and quiet?


Can you imagine that!? 

A piece of junk wood turned into a delightful imperative.
An open window through which to fly.
I love the power of words!

Wednesday, April 13, 2016

It Is Well - a new print!

This new print is just bursting with sunshine! It makes me smile every time I see it. "It Is Well" reminds me of one of my favorite hymns, speaking of comfort through all those rocky, gray, dreary times we encounter. Comfort that comes through the One who salves the soul. What a joy and delight that is!


I got big 11x14" prints made because this might be my favorite painting to date. The cheery colors, the flowers, the bouncing letters just speak JOY into my heart. I am so happy to share this with you and hope that you find will find that It Is Well with your soul too!

Prints are available in my etsy shop, Domina Design.

Tuesday, February 23, 2016

The "Better than Sweatpants" Skirt

Recently I scored a queen sized jersey knit bedsheet at a thrift store for only $3.00. I planned to make a few yoga waistband skirts with it. Because a few of you asked about my method of sewing a yoga waistband, I thought I'd share the process.

But a few caveats - There are a ton of yoga waist sewing tutorials out there in blog land. This method is not unique to me but it is the method that I like and fits my shape. Second, I am not an expert seamstress. I do, however, have a fair amount of experience, mostly from the school of hard knocks. I also am not a great photographer, due to a crummy camera. So bear with my dimly lit and slightly blurred photos. Apologies in advance!!

Let's get sewing!

Like I said, I got this queen-sized bed sheet. It's KNIT, not a cotton bedsheet. So it stretches, which is precisely what will make this yoga waistband maxi skirt sooo comfy. Do not try this tutorial with a cotton woven fabric. You will not be able to get into your skirt!

If you don't happen to have a large knit bedsheet laying around, you can always purchase yardage of knit fabric. There are different types of knits that are more or less suitable for certain applications - again, I'm no expert, and when shopping the thrift store I snatch up whatever I can find. I think this particular bedsheet is a jersey knit. It's stretchy in both directions, but more so one way than the other. My fabric has pinstripes, and the stretch is across them.

1. Lay out your fabric with the stretchy direction running sideways (this will go around your body). I folded it over about 30". If you want a larger hemline, fold over more.

2. Near the top, mark a center point with pins. I like to make an X. Time for some simple math. Really, I'm an artist, math is not my BFF, but this isn't hard! Measure around your waist and divide that number in half (my waist= 33", cut in half is 16.5"). With a tape measure mark either end of that measurement putting the pin X in the center. This is the waistline of the skirt. (Midpoint of my waist's 16.5" is 8.25", shown below). 


3. Now measure down from the waist center point about 7". This is the hipline center point. Mark with pins.


4. Measure around your hips. Divide that number in half and center the measurement on the hip line marked on the fabric. (My hips are 40", cut in half is 20"). Mark each end of the hip line with pins. In the photo below you can see the waist and hip center and endpoints marked with pins. 


5. Figure out how long you want your skirt. I am making a maxi skirt, so I want mine to go down to my ankles. Hold a tape measure up to your waist and let it fall. I drop the 0" end so I can read the measurement at my waist without having to bend over. For my maxi skirt, I measure 39" down to my ankles (yeah, I've got long legs! Now you know why I'm sewing my own skirt!) Your measurement will vary. Remember to leave some extra length if you plan to hem this. Because we're using knit fabric, it won't fray or unravel. I often leave my hems just cut, and they might roll up a little. It's a casual look. Mark the length with a pin and put pins on either side of the hemline. I ended up with a 27" wide hem, because I estimated the 30" fold.


6. Now it's time to draw the seam lines! I use my tape measure as a guide and basically connect the dots that we've pinned. Cut about 1/2" outside the line. You will now have two pieces - a skirt front and back. Congrats! This was the hardest part!


7. Sew the side seams of the skirt. Remember to use a ball point needle when sewing knits! I don't have a serger, so I just use a medium stitch length and go back and zigzag the seam edges to finish them. You don't have to zigzag, but it does keep the seams from rolling in. Be careful not to stretch or pull the fabric as you sew. It's a good idea to try it on to make sure the fit is what you want.


8. Let's cut the yoga waistband! Make sure your fabric is folded over and the stretch is oriented the same way as the skirt. I once made the mistake of cutting a waistband with the stretch going the wrong way - I could not wriggle it up over my hips! Stretch should go sideways, around you!

Take your half your waist measurement and subtract an inch or two, depending on how stretchy your knit it. You want the waistband smaller than you (called negative ease) so it hugs you and your skirt doesn't fall off while you're walking through the supermarket. I cut it 20" high so that it can be folded in half when sewn on and still have length to fold over, thus the yoga-ness of the waist band.


9. Sew up the side seam. Then fold the waistband in half. You'll need to pin it to the skirt right sides together. I have the skirt inside out in the photo below and am in the process of sliding the waistband inside. The skirt is wider than the waistband, so you'll need to stretch it gently to fit the diameter of the skirt. Use lots of pin, they're your friends!


10. Sew the waistband onto the skirt. I like to do a double line of stitching, just to make things really secure. Remember to stretch the skirt while sewing. This allows the line of stitches to stretch when you pull it on over your hips. Finish the seam with a zigzag. Below is the skirt and waistband, inside out.


11. Turn it the right side out and give it a gentle pressing with an iron. That evens out any wonky stitching. Try it on and do a little dance! If you want to hem the bottom, do that now. I left mine unhemmed, perhaps to add a ruffle later. I could hem it later too. Wear with the yoga waist band folded over for that uber-comfy fit! 


It's a nice, wide, comfortable waistband with just the right amount of give.


A finished skirt! I'll definitely be wearing this a lot this Spring and Summer.


A long post, but this only took about 45 min to sew, including stopping to take pictures. 

Let me know if this was helpful - and I'll love to see pics of your hand sewn yoga waist band skirts!